![]() |
| Supermarket bought growing herbs: curly parsley, my fav sorrel and flat leaf Parsley. The Sorrel has now been growing 2 weeks. I am not sure whether it's losing some of its flavour though. |
Blog subjects
Art Business
(2)
art inspiration
(1)
Art Style
(13)
Art supplies
(6)
Art Techniques
(29)
art works
(1)
Artists
(8)
Baking
(11)
Bookmaking
(1)
charity shop finds
(2)
Collecting Art
(8)
Colour
(2)
Colour color
(1)
cooking
(16)
Crafts
(15)
Design
(18)
Designers
(8)
Designers Block
(7)
Digital Work
(17)
Etching
(1)
Exhibitions
(16)
fashion
(1)
Framing
(3)
Inspiration
(25)
Knitting
(6)
Landscape
(3)
LIfe Drawings/Paintings
(13)
My work
(47)
Portraits
(7)
Printmaking
(9)
Screenprinting
(3)
Sewing
(18)
Still Life
(7)
Stuff to Do
(1)
Theatre
(1)
Time for a Moan
(2)
Travel
(2)
Work out and about
(7)
Search blog
Monday, May 14, 2012
Windowsill herb growing experiment
Always had problems growing herbs. Sick of supermarket ones going off. This time the pack said water from below and this seems to helped.
Drawing and painting on phone - me and Hockney
Am in heaven again - doing a blog on art discoveries while watching Two Hairy Bikers Mediterian cooking.
After playing with Autodesk's Sketchbook - free version (can't get paid version which gives more layers and brushes and features till i can get account of phone changed), I have found it fantastic. A few things have come up that I hadn't thought of but would equally apply to painting on canvas or on computer. For example I had this book for getting portraiture colour right.
I had scanned colour chart into computer and used the colour numbers shown in Photoshop, looked up in wikepeadia to get colour name in mixed colours - the book gives you recipes to mix the colours from basic colour set for each type of skin colour. Wasn't sure quite how I would use this. Then when i got the phone, I took pic of chart with new phone, imported it as background layer in Sketchbook, made another background layer with head structure and used the 3rd layer to work on.
I will definitely get the paid version when i can and also 'Brushes' used by Hockney on ipad when i have one.
Also here are the drawing pens I bought and made for the phone.
HOCKNEY
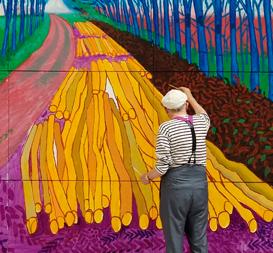
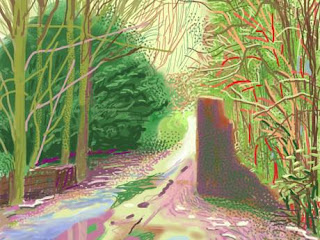
I loved Hockney's exhibition of landscapes mainly for their colour but really because of his amazing love of moving forwards. I am reading a book of interviews with him going back to the 80s and he's always been like this. I read his interesting study of use of camera's in art going back to Renaissance (use of camera lucida -lenses) - lots disagree with him, and his use of photos in 80s and 90s to explore cubism in his painting - this relates to how we see which the camera can't really replicate. Now in his 70s he's using digital media, still getting up at 5am everyday to work, painting outdoors in Yorkshire weather. The great thing he did in the Royal Academy exhibition was to show how using ipad allowed him to sketch the weather as it changed everyday before he did his large scale paintings - in the main hall you had one large oil painting made up of about 15 canvasses of a part of a wood in spring. On the other 3 walls you had about 40(only part of 100s he did) large ipad printouts of his sketches done from Feb to June showing the wood going in and out of spring - his sketches he did to do the painting. I love seeing artists sketchbooks. It was great to see how he could see the same scene so differently each day. He also showed how he has experimented with ipad drawing - because he knows he wants to print it out in huge printouts, he had to adjust his painting and setup on ipad accordingly. It's the first time the Royal Academy has given it's room to an artist to do contemporary work not finished till the exhibition and to large scale digital printouts as part of painters work. You can see Brian Sewell's critical review (i don't disagree with it all, I just love what he's doing to advance digital work) http://annecane.wordpress.com/2012/01/28/david-hockney-ra-a-bigger-picture-royal-academy-review-by-brian-sewell/
Some of his exhibition pics:
He says he'll probably go back to paintings portraits now. I look forward to them. But who knows what he'll get up to next.
So I wonder what he'll do with ipad portraits.
After playing with Autodesk's Sketchbook - free version (can't get paid version which gives more layers and brushes and features till i can get account of phone changed), I have found it fantastic. A few things have come up that I hadn't thought of but would equally apply to painting on canvas or on computer. For example I had this book for getting portraiture colour right.
![]() | |||||||
| Phone screen showing Sketchbook layers - background colour chart, 2nd layer head structure and 3rd layer to draw/paint on. |
![]() |
| I draw on top layer using head structure layer as guide. |
![]() |
| Then i turn off head structure layer to start to draw more to get likeness - not done here. |
![]() | |
| I can then use the apps colour picker to pick the colours from colour chart layer. This is easier than opening up the menu and selecting colour from colour menu and gives me exact colours. |
![]() |
| By moving to different colour the colour pick changes colour and you continue drawing or paintings. |
![]() |
| Building up the colours |
![]() |
| Continue to build and change colours |
![]() |
| Layer containing colour using the sprayer. |
![]() | |
| The previous 2 layers turned on and more added. |
Also here are the drawing pens I bought and made for the phone.
HOCKNEY
I loved Hockney's exhibition of landscapes mainly for their colour but really because of his amazing love of moving forwards. I am reading a book of interviews with him going back to the 80s and he's always been like this. I read his interesting study of use of camera's in art going back to Renaissance (use of camera lucida -lenses) - lots disagree with him, and his use of photos in 80s and 90s to explore cubism in his painting - this relates to how we see which the camera can't really replicate. Now in his 70s he's using digital media, still getting up at 5am everyday to work, painting outdoors in Yorkshire weather. The great thing he did in the Royal Academy exhibition was to show how using ipad allowed him to sketch the weather as it changed everyday before he did his large scale paintings - in the main hall you had one large oil painting made up of about 15 canvasses of a part of a wood in spring. On the other 3 walls you had about 40(only part of 100s he did) large ipad printouts of his sketches done from Feb to June showing the wood going in and out of spring - his sketches he did to do the painting. I love seeing artists sketchbooks. It was great to see how he could see the same scene so differently each day. He also showed how he has experimented with ipad drawing - because he knows he wants to print it out in huge printouts, he had to adjust his painting and setup on ipad accordingly. It's the first time the Royal Academy has given it's room to an artist to do contemporary work not finished till the exhibition and to large scale digital printouts as part of painters work. You can see Brian Sewell's critical review (i don't disagree with it all, I just love what he's doing to advance digital work) http://annecane.wordpress.com/2012/01/28/david-hockney-ra-a-bigger-picture-royal-academy-review-by-brian-sewell/
Some of his exhibition pics:
| The exhibtions main work that appeared on catalogue. |
![]() | |||
| One of the ipad printouts. |
![]() | |
| Hockney at work on ipad |
| He sends new ipad flower pic to friends every morning before starting work. |
| But he's still a painter - here working outdoors in Yorkshire on RA exhibtion work. |
| He applied this way of looking to portraits. |
| His mother. |
Pink thick knitted socks
![]() | |
| Not pretty but warm and quick to knit |
Thursday, May 10, 2012
My first Soufflé
Beginner's luck. I saw it on 2 Hairy Bikers Best of British TV show. They said we shouldn't fear it. It's easy. So today I was going to have omelet for lunch and thought, well souffle is like an omelette so I just did it from memory. I can't believed it worked without even remembering the exact ingredients - I made a roux of oil (had no butter/marg left) and plain flour, milk and cheese. Add 2 beaten egg yolks then folded in 2 beaten egg whites and cooked for 30 mins - suppose to be at 220 deg but i started off at 160 by mistake for first 10mins till i checked. So it must be easy if i can do it.
I am adding to this post as a friend has been dying to try a souffle and just this morning the wonderful Eric Landlard on channel 4, who i just discovered in the last few months, a fantastic French chef, maker of incredible fancy cooking especially deserts and has started a new series of Glamourous Puds. Yes, get rid of the stubble. The strong French features are enough.
This series is about the influence of Careme, starting off in Russia and today he made his mock non cook iced Soufflee which I must try. See it here http://www.channel4.com/programmes/glamour-puds/episode-guide/series-2. He makes things seem possible but they look amazing - eg: chocolate/chocolate mouse bejeweled Faberge eggs. I loved the film with Gerdard Depardieu playing the 17th century chef François Vatel and Careme introduced the Russian idea of eating food in courses so you got hot not cold food, to the rest of Europe.
Below is the recipe by the Two Hairy Bikers (which I will actually follow next time) and I will add Eric's when it comes up on the site - yes together in the same place. I will post when I have tried both of these, then I will know if it was beginners luck.
I am adding to this post as a friend has been dying to try a souffle and just this morning the wonderful Eric Landlard on channel 4, who i just discovered in the last few months, a fantastic French chef, maker of incredible fancy cooking especially deserts and has started a new series of Glamourous Puds. Yes, get rid of the stubble. The strong French features are enough.
This series is about the influence of Careme, starting off in Russia and today he made his mock non cook iced Soufflee which I must try. See it here http://www.channel4.com/programmes/glamour-puds/episode-guide/series-2. He makes things seem possible but they look amazing - eg: chocolate/chocolate mouse bejeweled Faberge eggs. I loved the film with Gerdard Depardieu playing the 17th century chef François Vatel and Careme introduced the Russian idea of eating food in courses so you got hot not cold food, to the rest of Europe.
Below is the recipe by the Two Hairy Bikers (which I will actually follow next time) and I will add Eric's when it comes up on the site - yes together in the same place. I will post when I have tried both of these, then I will know if it was beginners luck.
Two Hairy Bikers Goats' cheese and chive soufflé
·
300ml/10fl oz full-fat milk
·
1 onion, quartered
·
1 bay leaf
·
1 small bunch thyme
·
300g/10oz goats’ cheese
·
50g/2oz butter
·
50g/2oz plain flour
·
4 free-range eggs, separated
·
3 tbsp finely snipped chives
·
10g/¼oz finely grated Parmesan
·
sea salt and freshly ground black pepper
·
·
1.
Cut a 42cm/16in piece of baking parchment in
half lengthways. Fold one half in half again and tie around a 13cm/5in soufflé
dish using kitchen string. Lift the paper so it creates a collar that rises
around 5cm higher than the dish. Butter the inside of the soufflé dish and the
paper generously.
2.
Put the milk in a small non-stick pan and add
the onion, bay and thyme. Bring to a gentle simmer then remove from the heat
and set aside to infuse for 15 minutes.
3.
Preheat the oven to 220C/425F/Gas 7.
4.
Place a baking tray in the oven to heat. Strain
the flavoured milk through a fine sieve into a jug. Cut the rind off the goats'
cheese and cut the cheese into 2cm/¾in pieces. (You should end up with 200g/7oz
cheese.)
5.
Melt the butter in a heavy-based saucepan over a
low heat. Stir in the flour, cook for a few seconds then gradually start adding
the milk, a little at a time, stirring well between each addition. When the
sauce is smooth and very thick, continue to cook for a further two minutes,
stirring constantly then remove from the heat and stir in half the goats'
cheese.
6.
Whisk the egg yolks lightly and stir into the
milk mixture until smooth. Season to taste with sea salt and freshly ground
black pepper. Pour into a large mixing bowl and cover the surface with a sheet
of cling film to prevent a skin forming.
7.
Whisk the egg whites with a pinch of salt until
stiff but not dry. They are ready when you can turn the bowl upside down
without them sliding out.
8.
Stir the chives into the cheese sauce. Fold in
the remaining cheese. Fold in a large spoonful of the egg white until combined,
then fold in the remainder.
Watch technique0:35 mins
9.
Pour the mixture slowly into the prepared
soufflé dish. Sprinkle with the parmesan and freshly ground black pepper. (Keep
the parmesan towards the centre of the soufflé so it doesn’t melt and hinder
the rise by sticking to the paper.)
10.
Bake on the preheated baking tray in the oven
for 23-25 minutes or until golden-brown and risen. Remove from the oven, remove
the string and serve the soufflé immediately.
Wednesday, May 9, 2012
Aussie Lamingtons - Heaven
Haven't had these for over 20 years since Oz days. Never made before. Yummy. Sponge 'laminated' in chocolate runny icing/sauce and dipped in coconut (that's not why they're called Lamingtons -see - http://en.wikipedia.org/wiki/Lamington 'Friday 21 July 2006 was designated as National Lamington Day in Australia' ) . Since John doesn't like chocolate much I will experiment with my favourite 50% fruit jam made into a sauce instead of the chocolate - jamingtons?
Friday, May 4, 2012
Cheese sauce eggs on toast
Felt like eggs on toast with cheese sauce so tried 2 version. 1. to try out my egg slicer. 2. my version of egg cooked in ramikan i saw on My Litte Paris Kitchen. Cheese sauce made with a roux, little milk and ball of mozzarella cheese and grated extra mature cheddar. Both were delicious - much better than they look in my quickly taken pictures.
1. sliced boiled egg on toast with cheese sauce and rocket.
2. A slice of bread with crust removed to line a ramikin baked in oven with baking beads to hold shape, for 5 mins. Then add cheese sauce and rocket, egg and cheese sauce again and rebake.
1. sliced boiled egg on toast with cheese sauce and rocket.
2. A slice of bread with crust removed to line a ramikin baked in oven with baking beads to hold shape, for 5 mins. Then add cheese sauce and rocket, egg and cheese sauce again and rebake.
![]() | ||
| Just out of the oven |
![]() | |||
| Egg side up |
![]() | ||
| Bread side up |
![]() |
| Cut open |
My new coffee perculator compared to espresso stove top makers
Got my lovely looking retro percolator from amazon yesterday. Was worried I was wasting money on something that wouldn't make good strong coffee, but I am very happy with it. Was £25 - can get it here: http://www.amazon.co.uk/gp/product/B004AMQXQE/ref=fb_lfb_prodpg_0. Comparable in price to large 12 cup/600ml espresso makers (£20-30) but holds almost twice the liquid - 1000ml.
I bought it because although I love my espresso makers - (they make great very hot coffee and my coffee has to be boiling hot which is why I don't like cafetieres) - they do not hold enough coffee when I have visitors. The internal parts of the perculator look a bit flimsy - lightweight aluminum so I will find out from the seller if there replacement parts - (will update review then). In the meantime I am careful with them when washing. In case you wonder - the handle doesn't get too hold to hold.
Size comparison
Thought this would be useful to people considering buying coffee makers as the different sizes in espresso makers have always confused me:
I usually use a 1 heaped desertspoon per mug/300ml water -I like it strong - in my espresso makers. With the perculator I added another 1/2 spoon per 300ml. I need to experiment more to make sure this is correct but I think the pressure in the espresso makers get more flavour out of the coffee. So, if you add a litre of water and nearly fill up the basket of the perculator you will get good strong coffee.
I used Ikea espresso ground coffee equavalent to strength 6 on supermarket shelf ratings - best value for flavour ground coffee you can get - approx £1.70 compared to £2-4 for supermarket equivalent size and strength.
Here are 2 pics showing the size difference of my coffee makers:
Internals very light weight aluminium but ok. Though it looks messy, I didn't end up with any coffee granules in my mug. I think this only happens when you use the last dregs and you can always use fine sieve at this point:
I bought it because although I love my espresso makers - (they make great very hot coffee and my coffee has to be boiling hot which is why I don't like cafetieres) - they do not hold enough coffee when I have visitors. The internal parts of the perculator look a bit flimsy - lightweight aluminum so I will find out from the seller if there replacement parts - (will update review then). In the meantime I am careful with them when washing. In case you wonder - the handle doesn't get too hold to hold.
Size comparison
Thought this would be useful to people considering buying coffee makers as the different sizes in espresso makers have always confused me:
- The Percolator holds litre of liquid (3/4 way up to beginning of spout) - that's just over 3 of my 300ml coffee mugs. It didn't work well with just 300 ml/1 mug as it wasn't enough liquid to get up the spout but good with 600mls -1 litre. That's fine with me as i bought it for larger amounts of coffee. When i made the larger amount I used the remaining amount the next morning and it tasted good (sacrilege to some of you coffee lovers who don't like reheated coffee) as I wanted to see if I could use it to make coffee once a day and use it throughout the day.
- The espresso coffee makers are measured in terms of tiny espresso cups - approx 50ml depending on brand:
- my large one - so called 9 cup one holds about 450ml or 1 1/2 300ml mugs,
- the medium one which i use when i just want a cup for myself - the so called 6 cups one,
holds one 300ml mug - the tiny one is more show than anything, but you can get a cup of coffee out of it if you
add more boiling water - the largest ones you can buy - so called 12 cups hold about 600ml
I usually use a 1 heaped desertspoon per mug/300ml water -I like it strong - in my espresso makers. With the perculator I added another 1/2 spoon per 300ml. I need to experiment more to make sure this is correct but I think the pressure in the espresso makers get more flavour out of the coffee. So, if you add a litre of water and nearly fill up the basket of the perculator you will get good strong coffee.
I used Ikea espresso ground coffee equavalent to strength 6 on supermarket shelf ratings - best value for flavour ground coffee you can get - approx £1.70 compared to £2-4 for supermarket equivalent size and strength.
Here are 2 pics showing the size difference of my coffee makers:
Internals very light weight aluminium but ok. Though it looks messy, I didn't end up with any coffee granules in my mug. I think this only happens when you use the last dregs and you can always use fine sieve at this point:
Wednesday, April 25, 2012
Knitted socks as shoes prototypes
Learning to knit socks. After knitting black pair for J, I am now trying to learn to knit socks that look like socks in shoes. This pair is made up of the 2 prototypes. I can't bear to unpick them so will wear myself. Still some problems to sort out.
Monday, April 23, 2012
Spicy Cheesy Peanut Butter Biscuits
Felt like something spicy and savoury on a rainy afternoon and couldn't be bothered going to the supermarket so I improvised. Flour, cheese, peanut butter, butter and spices - black pepper, cayenne, paprika, mustard powder and garlic salt. Yummy.
Wednesday, April 18, 2012
Revamped shirts
As well as sewing new jim-jams, I have been revamping John's shirts. He was going to throw out because they were too baggy and long. I thought the materials were too nice. The lovely blue linen one on the right is Donna Karen. So I turned up the bottoms to make them straight, newer style of wearing outside trousers but still long enough to tuck in for work. I also worked out how to take off 2 1/2 inches off the chest and sleeve width from the one on the left. Now that I know this is possible I can revamp more of his shirts. Next experiment is to tailor one with some darts.
Chicken Dumplings
Saw it on 'little Paris kitchen' last night but recipe not on site and i didn't pay enough attention so i did my own thing on it.
1. Cut the meat off 2 chicken quarters and put the left over chicken bones and skin, with a couple of wings, in oven to brown for 20 mins.
2. Put chicken pieces into food processor with 1/2 fried onion, seasoning, lemon juice, mozzarella cheese ball, egg and flour. Spoon out into little chicken dumplings and rolled in seasoned flour.
3. In big pan add chicken stock/2 cubes, seasoning (pinches of S&P, cayene, paprika, mustard, vinegar, bay leaf, ginger ). Add the roast chicken pieces/bones/skin from oven with cabbage, celery, 1/2 fried onion and 1 red pepper - all finely sliced/shredded. Cook for 15 mins.
4. Add chicken dumplings and cook further 30mins.
Have only just realise that this blog is a great dumping (not dumpling) ground for things I don't want to forget - a proper useful diary/cookbook/sketchbook etc.
1. Cut the meat off 2 chicken quarters and put the left over chicken bones and skin, with a couple of wings, in oven to brown for 20 mins.
2. Put chicken pieces into food processor with 1/2 fried onion, seasoning, lemon juice, mozzarella cheese ball, egg and flour. Spoon out into little chicken dumplings and rolled in seasoned flour.
3. In big pan add chicken stock/2 cubes, seasoning (pinches of S&P, cayene, paprika, mustard, vinegar, bay leaf, ginger ). Add the roast chicken pieces/bones/skin from oven with cabbage, celery, 1/2 fried onion and 1 red pepper - all finely sliced/shredded. Cook for 15 mins.
4. Add chicken dumplings and cook further 30mins.
Have only just realise that this blog is a great dumping (not dumpling) ground for things I don't want to forget - a proper useful diary/cookbook/sketchbook etc.
Subscribe to:
Posts (Atom)