Monday, May 27, 2013

Its been tough but nearly there

Several times thought of giving up, missed a couple of classes, rested more and only 4 weeks more - i will only enrol in 1 class per week from now on.  Have nearly finished making frame, drawing starting to improve again, finally got a screen print to work and in next week's last etching class he will show me how to photo etch the sleeping child drawing that worked well in screen printing - i was disappointed with results of hand etching which came out to lightly and he couldnt tell me why (the lines on the paper showed i pressed hard enough and i left in acid long enough.)  It's anoisy dirty class so glad it's ending.

Screen print worked so printed on test paper, good textured paper, cotton, vests then went toclass storeroom to take off one ofmy tops to print on as screen emulsion may have disintergrated by next time.  Got to use urea this time to thin some ink. Fortunately it was oderlous and clear.
Overdid the neck tendons.
Model on left is amateur is amatuer actor and so loves bringing in costumes which normally annoys me, but this time they dressed brilliantly to copy 'The Card Players'.

Friday, May 3, 2013

This weeks classes

Tuesday Etching 

Too tired after visiting 2 galleries.  No place to sit tho teacher did try to help.  Printed out both plates. First time wrong side up, top pics, second time correct darker lower pics.  I knew he told me to take out of acid too soon and i can see i was right as they are too feint.  One on the right disappears top left and bottom right.  He is now going to show me how to work on plates further using stop out varnish, more acid, reprinting, and so on.  I see others been working on plates for months. I dont have patience for this.  Its dirty hard work in chaotic envirnoment and i am glad only 5 weeks left.  


Left - etching done on soft ground, top too light as i put plate into press wrong way up.   Right - etching done on hard ground, not long enough in acid.


Wednesday Screenprinting

 I forgot to take pics of processes as i promised.  Will try to remember next week.

Most people used 2 screens.  i thought easier to put more on one.  But this makes it difficult when it comes to printing.  Also i used the machine alone, as teacher was busy, to develop the emulsion.  After 1st time i thought it hadnt worked so did again and eneded up with blurred double development on the left hand side which had moved.  The right hand side, the hands had stuck to screen so didnt move, thus worked ok.  Next week will try 2 screens, a water bottle, and a pattern.  

One good tip a student told me (i will take pic of this) - print first part of design on see thru acetage when you have screen locked into print board, mask tape this to the board that hold the screen.  Then you can position your material under this printed acetate, fold acetate back out of the way and then pull down screen and print next part of screen.


Right and middle - 2 prints on calico.  Managed to match up 2nd colour, red, even tho i didn't have registration marks on screen because teacher hadnt told me to do it before developing screen.
Left - several drawings that are blurred because i accidentally double developed - on calico.


Bottle design for next week - one screen (should really be 2 if want to print quickly.  Left - background colour with a river,  for bottle label.  Print this first then print bottle on top.  Registration marks can be seen as crosses top and bottom for matching these two parts.


(Will add pattern design here when i design it in photoshop hopefully this weekend.)


Thursday - frame making with lovely old Silvio.  

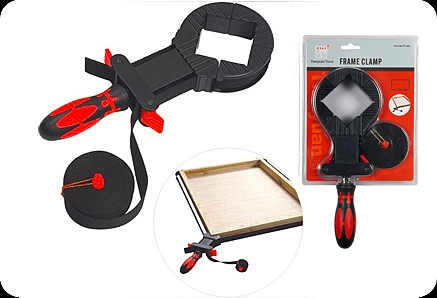
Half class didnt turn up, given up on the chaos I guess.  Even though less of us, he kept disappearing, helping advanced students, and doing paperwork.  So we chatted - we have agreed that we will learn one thing each week and not worry about it.  This week we planed our sawn mitred ends, and learnt to use clamps to glue frame together.  Left frames to dry.  Next week paint, stain or wax frame and maybe importantly, cut mount board.  B&Q have manual mitre saw for about £20 and electric £50 and the clamp for £12.  Getting the type of planer he uses more difficult.  He says about £150.  This helps you improve your sawed ends, slither by slither so that angle of cuts are right and fit together better.  My sawn angles, even with the mitre saw, were quite a bit out.  I am glad  I have made frame before cutting mount card as I don't have to be perfect measurement wise.


Manual mitre saw £18-22
Electric mitre saw  starting at £50


Framing clamp holds frame together while glue dries.  £12


Mitre planer - this one bigger than one we use.  I need to think and investigate on youtube etc about whether i can use normal planer perhaps in mitre box or something else as i certainly dont want anything big or expensive.

Still waiting for Amazon delivery, then more creative colour play - dying my crappy looking greying hair which I have left for far too long because too tired every time I remember to do it.  Just like plucking my tash & eyebrows and shaving nose hairs with nose shaver,  I remember it when I look in the car mirror in bright sunlight when it looks much worse than in my dull bathroom.  I now keep pluckers in bag and have been known to pluck in car, in the disabled bay, in Trafalgar Square.  The tourists think its performance art I'm sure.  Just realised its 6pm.  I could have gone to school and been back in time for delivery.


Posting via email on ipad

Finally worked this is the easiest way to post on ipad.  Why did it take so long?  Subject becomes heading, attach photos and enter text in body.  Photos dont always go where u want them but that can be fixed in app, tho easier on desktop.

--
Shirley Grange


Cant wait for this exhibition - Australia at Royal Academy


Problems viewing this email? Click here for an online version
Sidney Nolan, 'Ned Kelly' (detail), 1946. Enamel paint on composition board. 90.8 x 121.5 cm. National Gallery of Australia, Canberra. Gift of Sunday Reed, 1977.


Hello,
This morning, we presented our major autumn exhibition, Australia, to the press. Marking the first survey of Australian art in the UK for more than half a century, I am confident you will share our excitement over this hugely ambitious undertaking.

An exhibition that has been in the making for several years now, it has been a journey which has opened our eyes to the distinctiveness of the Australian landscape, the complexity of its indigenous and colonial history, the extremes of its nature and above all, the power of its art. We hope to share this story with you, spanning 200 years from 1800 to the present day, taking in over 200 works including painting, drawing, photography, watercolours and multimedia.
The majority of the works in the show have never been seen in the UK before, and some of Australia's most iconic works, drawn from major public collections from across Australia, have been secured for loan.

My personal hope as someone who has experienced the majesty of Australia's landscape first hand and who has been captivated by its culture, is that this exhibition will showcase the sheer beauty and diversity of Australian art; exploring a nation both ripe with creativity and rich in artistic history.

At the Royal Academy, we are always seeking to broaden the canon of art that our visitors are able to experience, whether it be bold contemporary work, 
ancient sculpture or ground breaking architecture; we aspire to challenge and inspire; Australia promises to do just that.

Tickets are on sale now so I urge you to book early for what I assure you will be a wonderful odyssey through the heart of a nation and its people.

Kathleen Soriano
Director of Exhibitions
Australia (21 September - 8 December 2013)
#RAAustralia


Throwing out Work

2 heads done on ipad, the two lying down i threw in bin in drawing class as i only want to keep stuff i really like.  However they look better in picture.  Few people said i should have kept.  I could have reused in Mixed media, tear ups, collage etc.  just not feeling that creative.  In any case if i do like them then i will get to point when i can produce them easily so no real loss.  It shows the advantage of being able to keep work on ipad, both drawn on ipad and pphotos - if i throw out ok work, i now photograph them so i have a reference of how i progress.  Editing one's own work is very hard.  People often like work i don't.  It's easy to see a failure because you were trying for one style rather than seeing what the work is in itself.   I still think they're not quite right.  Certainly freer than the 2 ipad heads but they were just experiments with new media i bought that day - giant charcoal and graphite blocks, and art watercolor art bars, all by Derwent.


--
Shirley Grange


Thursday, April 25, 2013

Deceptive chair from designers block blog


Posted: 25 Apr 2013 07:28 AM PDT
This is seriously weird. Shown at Milan Design Week recently, it's a canvas that you can actually sit in. I love quirky designs like this. By Yoy, found at Yatzer

Posted: 25 Apr 2013 07:28 AM PDT
The Cloud That Will Make You Smile
This rainwater collector is called - The Cloud That Will Make You Smile. Well it doesn't make me smile at this moment in time as I am sick of the sight of clouds and rain come to that. London basks in sunshine and Northumberland basks in rain. Just not fair. Found at 1 Design Per Day
You are subscribed to email updates from designers block
To stop receiving these emails, you may unsubscribe now.


--
Shirley Grange


Monday, April 22, 2013

Preparations for classes

Busy week.  I have  exhibitions to fit in while preparing for classes.  I am going to be taking full allowance of pain relief if necessary as I am determined to get thru it.  This means I will be feeling very happy and even more talkative even though I will also suffer from dry mouth. which makes me drink more, which necessitates i am go to toilets at every available opportunity while i am out and about - a glamorous life.

Tomorrow morning I will pop into into wood frame place in hackney to check it out before going to Somerset house for graphics exhibtion, Pick Me Up which is only on this week and in same building the Courtauld for 'Becoming Picasso' exhibition.   Then off to school to photocopy work for screen printing and then etching class - I still have to draw on spare plate tonight for that.  

Wednesday Screen printing I will also have to prepare for tonight and tomorrow night.  This is where i am with the graphics ready.  I am preparing enough graphics for 2 A3 screens.  You don't have to fit this much in, some people just put a star or a flower in the middle, but as usual, i want to get as much in, to get the most out of all the processes I will have to do.  I will use the schools screens but will ask teacher for list of suppliers to get screens, and other small equipment.   Here is where i am and need to finish tonight so i can photocopy at school tomorrow onto 2 A3 sheets.


Screen 1 left side will be 3 rows of graphics i can use separately or on top of greek writing below etc.  One of these may be a photo formatted in half tone in photoshop but not sure i will have time tonight to do this.    Right side is a Tshirt design, main black ink design and above it second colour - red fingernails which will be done when black is dry.  It is done with 'registration' marks to ensure correct positioning.  I did the nails by tracing through on top of the hands then tracing this above to get on one page.  I think it would be much easier to do this in photoshop.

Screen 2.  I drew the skeleton head 4 years ago ( l loved it as my first good drawing done in ink without any thought, and gave me confidence to go back to art) and i had prepared it as pattern in previous screen print class but never printed it.  I can be printed as 9, or strip of 3 or just one head over perhaps the greek writing on the right.  Skeletans are very in, not really my thing, but i only print on old sleeping gear.
PS. 4 HOURS LATER AND EXHAUSTED AND ACHING SO HAVE USED OLD DRAWINGS TO FILL IN GAPS ABOVE.

Thursday morning I will go back to wood place if i need more time to decide on wood to buy, go to Royal Academy Print Show only on this week, then National Portrait Gallery for Man Ray portraits before my membership runs out which i am not renewing.

Then off to picture framing class.  I am taking a drawing I did of cafe owners child and they told me on facebook they would like a copy.  This is the simplest frame to make.  I also need to frame 2 canvasses i bought, the gold is one of a past teacher and the bright coloured one is by an 8yr old child i bought for £25 which was the only one left by him, all the others had been sold.  I think it has Hockney influence from his last exhibition though not sure the artist knew.  I am taking these to get framing teachers input as they are both tricky colours.

Drawing I will use for first,  simplest picture framing.
Gold leaf letter Canvas for framing suggestions from teacher

Childs painting for suggestions from teacher.  At the moment I  have it on table as I had been trying to adapt a clazed box frame I had.  The teacher mentioned spacers which is exactly what i need.  I will see if the wood place has them.  They will stop the painting touching the glass and another set will keep the backing at the back of the frame, as it had been made to sit just behind the glass for a drawing.


My table and other work room updates

Kim's talk of her work on her table, All About Me blog, inspired to go check my table's capacity for inclining top.  Unfortunately the 2 levers are on the side that raises which is against another table and so not accessible easily, pity they are not on not the lower which of course is the side you sit at and there are only 2 positions, vertical and horizontal, nothing in between.  The levers that have to pull out to release the top for moving are also very difficult as my arthritis wrists don't turn enough to hold both without extreme pain.  So, for now i have left if inclined with the back held up by other table and the front stopped from lowering further by a magazine on my filing cabinet.   The raising of the table has given me extra room round tables as they fit one under the the other.  I can move them as necessary.  I will try it for a while.  The incline is ok so things don't slide down much.  If i like it i may add a lip to lower side, perhaps one that can be removed if i am using the table for machine sewing.

This has been done over the last year.  I will blog when i have finished, don't hold your breath.

This table was £25 charity shop buy, brown top and chrome crossbar legs on castors.  As part of my project to blind myself by painting my flat and everything in it white, i used some old wall paint to paint table.  The paint had some yellowing.  I ended up doing 5 layers.  I finished with a coat of PVA for protection.  I will eventually do a coating of white again from new batch of paint and another PVA coat.

PS. SEVERAL HOUR LATER - I HAVE BEEN USING TABLE ON THE SLANT AND LOVE IT.

These photos were taken on phone, then i used phone/android/ipad app called Skitch to annotate which also links into Evernote the notetaking app I use often on phone and ipad for lists, reminders, addresses etc.  Its quicker than opening photoshop for annotation of pictures.

The cabinet below was Ikea £25.   Thought it would be difficult to assembly but was designed beautifully for assembly and I enjoyed it.

You can see in the background that I still have a lot of shelving to paint white.  I put it off as it takes so long, so many surfaces, one pva to make paint stick to laminate, 3 coats paint and  I think i will finish with PVA which I haven't done previously so thats another coat - i may combine pva with last white coat to save time if that works.

And with all this table space , i end up preparing for classes this week lounge, as i did it while in bed or watching TV.


Ikea clear boxes with lids and carry handle boxes
Although I thought it would save money and look nicer by covering old cardboard boxes i had in my own design paper, there is no getting away from the fact that finding things is easier in clear boxes and that a sturdy carry box means i can bring a box of one media onto the table at once be it watercolour, inks, etc.  The only area of shelving i have left is the little bottles of arcrylic as i have them organised in colour groups that are easy see, decide on and get off the shelf.

4 boxes with carry handles - pencils and pens, watercolour, inks,  drawing accessories rubbers, sharpeners etc.

Print section - inks, stamps, etching plates, printing inks, also clothing and china inks.

Sunday, April 21, 2013

New classes this week.

I already blogged about Etching on Tuesday.

Wednesday was Screen printing. While most classes are 2.5 hours this was 10-4. And i was tired by lunch time. Another nice teacher. More complex machinery than when i did it at Mary Ward centre where we used a 150W bulb and our watches for timing, to react the photo emulsion. Here its a huge machine that sucks out all the air and times the whole thing. Iprefer light bulb as is something that can be set up at home.

Thursday was picture framing. Hysterical. Chaotic. Teacher is italian in about his 80s. While he is trying to give us an intro talk, his advanced pupils, mostly middle aged women who have been with him for 20yrs, were talking loudly right near us. We all kept looking at each other wondering when he would tell them to shut up. It didnt seem to worry him. Finally he saw our looks and told them to keep quiet. I have had classes like this before. A talented ecentric. You dont learn quickly, just a few gems per class. We sawed a piece of wood in mitre saw and then used planer with a leaver action to smooth it. Class was 2.5 hrs. Sawing took 5 mins. Intro talk took 20mins. Then he looked at artworks bought in and suggested type of frame - he had some lovely ideas which is what i want - color combinations, proportions, styles, methods and hopefully how to cut mounting card. I hadnt taken anything as i didnt know to. Then he disappeared so we drifted out during the last hour. He told us where to get wood for next week. Its at a huge place near me so i will go check it out tomorrow. They are suppose to be very rude. I will get cheapest, plain wood for a little drawing. Keep it simple. Then i will go onto 2 canvases i have that need framing. Most of equipment is cheapish and at B&Q. I may not make my frames in ghe end, but i want ideas. I have quite a few old frames and need to cut mount cards to make them fit pictures.

Frid. Was my usual life drawing.

Homework. I now have to draw on etching panel, get drawings read to fill 2 screen prints and get wood for framing. Exhausted just thinking about it. Did bit yesterday but was still getting over stiffness from the week. It is too much but only 6 more weeks when etching finishes, then another 3 before its all over so will try to keep all classes going. At least i am doing more art which feels good.

Tuesday, April 16, 2013

Etching class - fantastic teacher showed me great drawing method

Term 3 started.  It's been a while since i tried doing a few classes per week.  Worried it may be too much.  But, today anyway, the sun shone and my arthritis reacted well to all the painkillers.   Its been a very good day, the most upbeat I've felt in months.

 It was a 2-1/2 hour etching class.  I was a bit nervous as from previous classes, i know it can be complicated and one needs to be careful because there a mild etching acids etc.  On arrival I wondered why i was there, it seemed too much hard work,  but teacher was good and eased me in.  He showed me a method I had used but it seemed better this time, probably because he explained it really well - it was a WOW moment.

Its a perfect method for drawing.  His explanation wowed me because i finally got it - you draw into the wax you put on the zinc plate.  The wax reacts to how much pressure you apply with your pencil.   He got me to draw a light, medium, and heavy line.  The acid will start eating into the metal straight away say 30 mins, on the heavy line because you have pushed most into the wax and left little there.  The medium line will take longer so after 30 mins it will be more lightly eaten into by the acid, and the lighter line even less.  So, you can draw freely and get every nuance of line.   He showed me a great method of drawing onto the wax by using masking tape to lay butchers paper above the plate, draw onto the paper so you see you drawing properly.  This was absolutely fantastic.  Hadn't learnt this step before.

I had gone over previous notes and works yesterday, but when he said what did i want to do, i had no ideas.  Fortunately i had a drawing in my notes that i love by Honoré Daumier which i copied.  After i drew it, and was waiting for acid to eat into plate, i had time to compare drawings, seeing the mastery of his lines.  I practiced a few more drawings.  The teacher set up another plate for me to take home and do another drawing.

The drawing by Honoré Daumier showing wonderful use of line to show personality and garment movement.


My hurried copy drawn onto butchers paper placed over the zince plate coated in soft wax by placing the plate on hotplate, rubbing block of wax on the warmed plate, rolling it evenly, letting it cool to a smooth thin layer of wax which you can draw into.

The reverse of the drawing shows where the lines i drew have picked up the wax from the plate in exactly the thickness or thinness  i have drawn.

The zinc plate after it has been in the acid bath for 1/2 hour.  Next week i will ink and print.  That's when the hard work starts - right amount of ink, scriming, polishing, putting thru press, see print then go back to plate, remove any marks u don't want with varnish stopper, add other marks you may want, put back into acid bath - and so on till  you get what u want - its dirty, hard work.  I will have to take my time and it will challenge my patience, perserverence and desire to want to get things just right - like the million rewrites you do to a first draft.


Second plate to take home to make another drawing.  It has a hard ground - wax that is harder, applied in same way.  I will see what it is like to draw into.


While waiting for the acid to work, i had time to retry the drawing which shows I need to practice a drawing first before i try it on the next plate.  I may do a portrait of a friend.


Sunday, April 7, 2013

Went to non-religious Sunday Assembly in Islington

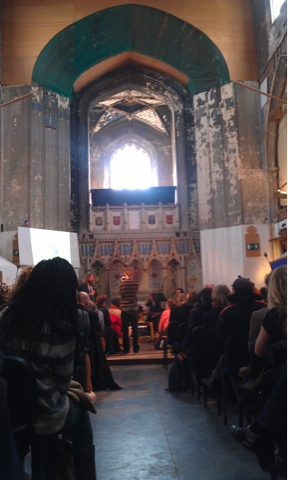
St Pauls, corner Ball Ponds Rd & Essex Rd. Started few months ago. On once a month. Is growing. In other countries like oz i think but i think London kicked it off. Co founded by 2 comedians. Met people from Kent, Exeter etc. exeter one meets weekly, started 3 weeks ago, Friday evenings. They came from all over to check it out, to help set up their own. A talk by writer Sarah Dunant, linked by inspiring funny snippets from comedian, fun songs, introducing oneself to those next to you, donation collection, tea and cake afterwards. Other groups like 'London Philosophers' and 'Good for Nothing' and request for volunteers to help run things. I might make cake!

Sun was out and arthritis responded to pain relief really well, so a great day.

Videos, singing 'Don't Stop Believing', and 'Always look on the bright side of Life', and laughter.


Thursday, April 4, 2013

Inspired by RA Manet portrait exhibition


Done from my imagination in 20mins, in RA cafe, using Procreate on Ipad, after seeing the Manet 'Portraying Life'.   As usual, i should have left it as i finished and liked it.  But, when i reopened it, i added a few touches which lost the original spontaneity.  Knowing when to stop - so important, so hard.  Still, its freer than some of the stiff sketches i've been doing life drawing from an actual model.   I've noticed this before - ie.  that drawings from imagination don't get bogged down in trying to 'copy' from life.